Showing posts with label auntie. Show all posts
Showing posts with label auntie. Show all posts
Thursday, March 28, 2013
Lifestyle Photos
Good afternoon! How is your Thursday going? Its another beautiful day here- we're above 10 degrees again this afternoon. The windows are cracked a bit again today, letting some of that wonderful fresh air into the house to freshen things up again. I love it!! We waited until nearly noon for Kyle to come home--he was gone for a good 16 hours last night! Yikes. He says there's a possibility he could be going out again tonight; if not, he's got a rig move going on tomorrow. In a way, I hope he doesn't have to work until tomorrow. He's going to need the rest. Switching from day to nights to days again is going to wreak havoc on his internal clock. I don't envy him at this time of year at all!
To keep myself busy last night, I created another layout, and the finished product came about by chance. Sort of. I desperately need a new blade for my paper trimmer, but Walmart doesn't carry the replacement blades (yet they carry the paper trimmer, itself. Go figure). Grrr. (On a tangent, its like training pants. They have potty training underwear for the littles, but don't carry the plastic liners that a toddler wears over top of them. S.M.R.T. If you ask me.)
Cutting regular weight patterned paper is taking chance into your own hands- the cut could be crisp and clean, but more likely, its going to be ripped and torn and plain messy looking. Which, it was. So, I decided to roll with it. I broke out a piece of sand paper (which I haven't used in a coons age), and distressed the edges of all the paper in this layout, including the pictures. I was going for a shabby chic sort of look. I don't think I mastered it at all, but I do like the distressed look. Actually, I love the distressed look. I need to do it a little more often. I love the personality and character it adds.
I began with a plain piece of white card stock, and used a tooth brush (of all things) to paint on the background. I like the dry brushing look it lends. I tried the splattering technique first, but haven't quite gotten the hang of it. I scrapped that idea and just painted the old fashioned way (except for the tooth brush part). I cut the squares of patterned paper to the same size as the pictures, which is 2x3--which I find works incredibly well for an 8.5x11 size layout, if you want multiple photos--then embellished them a bit using stickers, a photo corner and what was left of the patterned paper I used behind the white card stock.
Lastly, the numbers of the date didn't match my color scheme (which I pulled inspiration from Pinterest for), so I painted them up, too. I used a small paint brush to add color, then took a dry paint brush and dry stroked them to help some of the color pop through, but not too much. It also adds a bit more texture to the layout, too. IRL it almost looks like wood grain.
The inspiration for my layout came from Pinterest (it originally came from the JBS blog, I do believe), but there was no way I was going to be able to stretch my title work across the top of the page. I split it up- part of it along the top of the spread, and the last half along the bottom of my spread. It helps carry your eye right to the bottom of the layout. I think, though, if I were to tweak it a little more, I'd add some more deep brown accents to my layout, as another way to help draw a persons eye around the page. I can't help but feel the eye gets stuck on the date.
Meh, oh well. Work place hazard :) I'm still in love with my layout!!
I may or may not attempt scrapping again tonight. It all depends on what my husband wants to do and how he feels. If he needs more sleep, I'll be back in here crafting up a storm. But, if he feels lively enough, I'm going to chillax with him, instead. I've missed him these last two days!

Monday, February 25, 2013
Birthdays
Good evening! Did y'all get snow today, too? It was warm, but we still got a couple centimetres of the white stuff. I didn't want to go out and shovel it- I didn't even want to brush it off my car! I guess other things around the house were more important.
Last weekend, and the weekend before, were fabulous. The girls thoroughly enjoyed their grandpa M's 70th birthday, and they enjoyed even more their own birthday, which was the following Friday. We spent the day at home, just by ourselves, and spoiled the girls rotten. They got their most favourite foods at every meal on Friday, they got to open their presents, and their mama made them each a birthday cake (one cake mix, but two round cake pans) with the color of icing of their own choice. It was a really good day.
Saturday was an absolute blast. We threw a party for them, and invited the rest of the family (grandparents, aunties and uncle, and some new friends- to the girls). We had quite a few guests grace our house (and spoil my children rotten), but it was a really great time of visiting, catching up with old friends (and making new friends in the process! Our children had never met, and they're only a week apart!!), eating fabulous food (and no, I'm not trying to toot my own horn! LOL), and beating a pinata senseless. It was just very simple affair- a fruit platter, veggie platter, grilled cheese for lunch, some finger foods, and the best.idea.ever. for a birthday cake.
Dairy Queen blizzard cupcakes.
Ever heard of them?? Ever had one??
I think that was the biggest hit. The kids loved it, and I'm pretty sure the adults enjoyed them, too. There's still a few left over, and one of them is calling my name. Unfortunately, its too late at night to enjoy them!! Maybe tomorrow night...
Now that I've caught you up on the events in our lives this past week, I can share with you a new layout that I made.
Not that long ago, I decided to go out and buy acrylic paint from the Dollar Store. I wasn't sure how much use I would get out of it, so I only stuck to purchasing a couple bottles. (I wound up having to buy another one, because one of my girls got a hold of it, and emptied the entire bottle on herself and the love seat in the living room. It was the end.of.the.world.) No word of a lie. There's still some faint blue stains in the carpet (leading to the bathroom), but every ounce of the blue stuff came out of the love seat. Phew!! I know that both can be replaced, but I'm not as concerned about the carpet as I am the love seat. I don't want to replace the love seat any time soon; one of these days I would love to replace the carpeting in the living room with hardwood or something else. One of these days, we do plan on tearing out the carpet on the main level of our home. Having said that, though, I'm elated that most of the blue paint came out of the carpet, too. We need it to last until we CAN replace it!
Anyways...
On the last few layouts (two of which aren't being posted because they are not cooperating), I've been using my acrylic paint. I've been using my acrylic paint to paint wood veneers that I've been finding down at Walmart recently. In the scrap candy aisle. They're only a $1.00 each, and there's maybe 6-7 pieces in each little packet. I've got everything from leaves to crowns to helicopters and wedding dresses. I urge you to go and pick some up if you haven't already! They make great accents to any project!
So, on this project, I found a crown and painted it Island Blue (DecoArt brand). Its such a pretty colour! I had done part of the title in blue alphas, so I wanted to pick up more of the blue throughout, which is why I chose to paint the crown blue. To bling it up a little, I added some Recollections pearl rhinestones, and a clear rhinestone.
The centre part of the layout originally was dedicated to journalling (on the sketch that I used that inspired this layout), but as I was trying to figure out how I was going to make the journalling portion pretty, I came up with the idea of layering a few strips of scallop punched paper, on an angle, for some interest. I liked the way it looked so much, I decided not to cover it up (after adhering journalling strips and not liking that it was covering up the prettiness). Instead, the smaller blue half circle that's beside the larger circle (matting the crown) is actually a pull tab for hidden journalling. It also includes the date of the event we attended.
You're probably wondering what the deal is with the hats. Our niece got married on the first of September (2012), and silly hats were encouraged at the ceremony. The guests that came up with the most unique/goofiest hats would win prizes (which wound up being a bottle of wine. Pretty nice prize, actually!) There's a story behind Kyle's tacky piggy hat, but that'll be shared in a future layout. The girls, and their cousin Chloe, all got hats from the Dollar Store, so they could participate, too. Not that the hats lasted long.
I'm also trying to use up some of my older paper lately. The patterned papers I used on this project came from K&Co's Best Of Collection. There's 360 sheets of paper in it, and its great, but my only issue with it is its thin. Not always very functional if you want to...say...die cut something with your Cricut. Grr. Minor pet peeve. Sometimes even my paper trimmer messes up the paper. Anyways, there's a lot of gorgeous patterned paper in there, and I wanted to find something that would work well with red card stock, since red is the color of love, and since the major theme of this particular layout (though maybe understated) is a wedding.
You may or may not see more of it in future layouts. We'll have to see!
You WILL see more paint in the future- and in more colors than the three I currently own (blue, green, and antique white). Eek! I feel a Dollar Store shopping spree coming on!
See you next time,
~a
Last weekend, and the weekend before, were fabulous. The girls thoroughly enjoyed their grandpa M's 70th birthday, and they enjoyed even more their own birthday, which was the following Friday. We spent the day at home, just by ourselves, and spoiled the girls rotten. They got their most favourite foods at every meal on Friday, they got to open their presents, and their mama made them each a birthday cake (one cake mix, but two round cake pans) with the color of icing of their own choice. It was a really good day.
Saturday was an absolute blast. We threw a party for them, and invited the rest of the family (grandparents, aunties and uncle, and some new friends- to the girls). We had quite a few guests grace our house (and spoil my children rotten), but it was a really great time of visiting, catching up with old friends (and making new friends in the process! Our children had never met, and they're only a week apart!!), eating fabulous food (and no, I'm not trying to toot my own horn! LOL), and beating a pinata senseless. It was just very simple affair- a fruit platter, veggie platter, grilled cheese for lunch, some finger foods, and the best.idea.ever. for a birthday cake.
Dairy Queen blizzard cupcakes.
Ever heard of them?? Ever had one??
I think that was the biggest hit. The kids loved it, and I'm pretty sure the adults enjoyed them, too. There's still a few left over, and one of them is calling my name. Unfortunately, its too late at night to enjoy them!! Maybe tomorrow night...
Now that I've caught you up on the events in our lives this past week, I can share with you a new layout that I made.
Not that long ago, I decided to go out and buy acrylic paint from the Dollar Store. I wasn't sure how much use I would get out of it, so I only stuck to purchasing a couple bottles. (I wound up having to buy another one, because one of my girls got a hold of it, and emptied the entire bottle on herself and the love seat in the living room. It was the end.of.the.world.) No word of a lie. There's still some faint blue stains in the carpet (leading to the bathroom), but every ounce of the blue stuff came out of the love seat. Phew!! I know that both can be replaced, but I'm not as concerned about the carpet as I am the love seat. I don't want to replace the love seat any time soon; one of these days I would love to replace the carpeting in the living room with hardwood or something else. One of these days, we do plan on tearing out the carpet on the main level of our home. Having said that, though, I'm elated that most of the blue paint came out of the carpet, too. We need it to last until we CAN replace it!
Anyways...
On the last few layouts (two of which aren't being posted because they are not cooperating), I've been using my acrylic paint. I've been using my acrylic paint to paint wood veneers that I've been finding down at Walmart recently. In the scrap candy aisle. They're only a $1.00 each, and there's maybe 6-7 pieces in each little packet. I've got everything from leaves to crowns to helicopters and wedding dresses. I urge you to go and pick some up if you haven't already! They make great accents to any project!
So, on this project, I found a crown and painted it Island Blue (DecoArt brand). Its such a pretty colour! I had done part of the title in blue alphas, so I wanted to pick up more of the blue throughout, which is why I chose to paint the crown blue. To bling it up a little, I added some Recollections pearl rhinestones, and a clear rhinestone.
The centre part of the layout originally was dedicated to journalling (on the sketch that I used that inspired this layout), but as I was trying to figure out how I was going to make the journalling portion pretty, I came up with the idea of layering a few strips of scallop punched paper, on an angle, for some interest. I liked the way it looked so much, I decided not to cover it up (after adhering journalling strips and not liking that it was covering up the prettiness). Instead, the smaller blue half circle that's beside the larger circle (matting the crown) is actually a pull tab for hidden journalling. It also includes the date of the event we attended.
You're probably wondering what the deal is with the hats. Our niece got married on the first of September (2012), and silly hats were encouraged at the ceremony. The guests that came up with the most unique/goofiest hats would win prizes (which wound up being a bottle of wine. Pretty nice prize, actually!) There's a story behind Kyle's tacky piggy hat, but that'll be shared in a future layout. The girls, and their cousin Chloe, all got hats from the Dollar Store, so they could participate, too. Not that the hats lasted long.
I'm also trying to use up some of my older paper lately. The patterned papers I used on this project came from K&Co's Best Of Collection. There's 360 sheets of paper in it, and its great, but my only issue with it is its thin. Not always very functional if you want to...say...die cut something with your Cricut. Grr. Minor pet peeve. Sometimes even my paper trimmer messes up the paper. Anyways, there's a lot of gorgeous patterned paper in there, and I wanted to find something that would work well with red card stock, since red is the color of love, and since the major theme of this particular layout (though maybe understated) is a wedding.
You may or may not see more of it in future layouts. We'll have to see!
You WILL see more paint in the future- and in more colors than the three I currently own (blue, green, and antique white). Eek! I feel a Dollar Store shopping spree coming on!
See you next time,
~a
Monday, October 29, 2012
Smokin'!
Hi everyone!
What a fantastic weekend! Oh.my.word. Seriously, I had such a blast! It went all to quickly, unfortunately. But, doesn't it always!? In addition to having my hair done, and then having my boudoir photo session on Saturday, I also had the chance to (just barely) buy the girls some new winter coats, boots, running shoes and dress shoes. I wanted to hit Costco for their winter attire, but they had nothing out yet! What???! I was astonished. Walmart didn't have anything, either. Luckily, we found two (of three or four) coats in their size, and that.was.it. I still need to buy snow pants for the kids. I find it incredible that the supervisors at Walmart under ordered at this time of year. Another brownie point in my little black book for lovely Walmart! LOL

Here's a little preview of what my girlfriend and I looked like after we were all made up. Here's what we looked like before:


Dramatic difference, huh? I can't help but continually stare at the picture of us...I SO need to learn how to do my make up that way! We were smoking!!!!
Since I didn't have the time to, and since I hadn't uploaded the camera before this last weekend, I thought I'd take the time now to share with you some close ups of the last layout I completed.


Later on this week, I'll have a couple more DT assignments/reveals to share with you. I can hardly wait to get them posted!
In the mean time, I'll share a card with you that I made for our nieces' 3rd birthday two weekends ago:

This was super simple to make, and I think the final result is super duper cute! I used my Cricut to cut the cupcake card, using the Wildcard cartridge; I cut the cupcake liner out of blue/turquoise card stock, and the icing from white card stock. The candle and flame (as well as the birthday sentiment) were made using scraps. Everything is adhered to a kraft card stock background. For some sparkle and bling, I added clear rhinestones (to mimic sprinkles, naturally), and I used MS glitter in Crystal Fine for the sentiment.
Enjoy the rest of your evening, everyone!
Till next time,
~a
What a fantastic weekend! Oh.my.word. Seriously, I had such a blast! It went all to quickly, unfortunately. But, doesn't it always!? In addition to having my hair done, and then having my boudoir photo session on Saturday, I also had the chance to (just barely) buy the girls some new winter coats, boots, running shoes and dress shoes. I wanted to hit Costco for their winter attire, but they had nothing out yet! What???! I was astonished. Walmart didn't have anything, either. Luckily, we found two (of three or four) coats in their size, and that.was.it. I still need to buy snow pants for the kids. I find it incredible that the supervisors at Walmart under ordered at this time of year. Another brownie point in my little black book for lovely Walmart! LOL

Here's a little preview of what my girlfriend and I looked like after we were all made up. Here's what we looked like before:


Dramatic difference, huh? I can't help but continually stare at the picture of us...I SO need to learn how to do my make up that way! We were smoking!!!!
Since I didn't have the time to, and since I hadn't uploaded the camera before this last weekend, I thought I'd take the time now to share with you some close ups of the last layout I completed.


Later on this week, I'll have a couple more DT assignments/reveals to share with you. I can hardly wait to get them posted!
In the mean time, I'll share a card with you that I made for our nieces' 3rd birthday two weekends ago:

This was super simple to make, and I think the final result is super duper cute! I used my Cricut to cut the cupcake card, using the Wildcard cartridge; I cut the cupcake liner out of blue/turquoise card stock, and the icing from white card stock. The candle and flame (as well as the birthday sentiment) were made using scraps. Everything is adhered to a kraft card stock background. For some sparkle and bling, I added clear rhinestones (to mimic sprinkles, naturally), and I used MS glitter in Crystal Fine for the sentiment.
Enjoy the rest of your evening, everyone!
Till next time,
~a
Sunday, August 26, 2012
Visit
Did you hear? I'm having a giveaway! For more details, scroll down, or click on this link to head straight over there, and click here to see what's included in the RAK!


I thought I'd share a big photo post because I'm starting to find that I'm getting mixed up the farther behind I am posting here to my blog! So, if I can keep up with my online gallery posts, I shouldn't hopefully get confused anymore. There's two layouts that I'm pretty sure I haven't posted, but I am not 100% sure. I need to go back through my posts and double check, but I'm too lazy. Maybe one day I will, but not now lol.
These three layouts occurred back at the end of June, when Kyle's mom and step dad came up to visit. In the first layout, Addison was saying hi to grandma- they had just arrived. I wanted to stick with a green and yellow colour palette, and when I adhered the block sticker letters (they're actually the negative of the letters that were there at one time), they just didn't look right to me. I doodled the stitching onto each of the letters- I kind of like it. I love the homespun look, and that's how this looks to me.
Every piece of paper on that layout is scraps, save for the green polka dotted patterned paper in the background, and the grey piece of card stock everything is matted to. The flower embellies and the sentiment are Sandy Lion (dollar store), and the button is miscellaneous. This layout was also made using the week 1 sketch (July's) over at the monthly sketch challenge on scrapbook.com.
The next layout was made using another sketch, but this time I found it over at Page Maps (July 2009). A little later on that afternoon (when the grandparents arrived), the kids played in their pool and chased the new dog (to the grandparents) around. I wanted to especially highlight the picture of Addison switching hats with her grandpa- it just shouts all kinds of adorable to me!! Once again, all the embellishments on that layout are from the Dollar Store. (I have to admit, I'm quite impressed with the scrapbooking goodies our local Dollar Store carries...I think I should shop there a little more often!)
The last layout was done with my own brain power. I wanted to make this layout look like a magazine spread, because honestly, I {humbly} think it should be in a magazine! While the in-laws were here, they finally got my bed finished.
Bed finished you're asking yourself. Yes, finished. What began as a project that I wanted done while I was pregnant and living in Saskatchewan (I couldn't do it myself because of said pregnancy), wasn't actually tackled AND/OR finished until 2.5 years later and in a totally new province. Kyle had been hanging onto his waterbed frame (who knows why), and he asked me if I would like to use it as the frame for our bed. Yes, I told him, but only as long as it was made over. I loathed the 80's finish on it, and the horrid 80's frosted mirror that came along with it. Tacckkkyyyyy was all I could think.
I was a little afraid of how the mirror would look in it after we stripped the varnish, re-painted and aged the wood (which apparently was super simple- just mix half water and half paint, and once that dries, take steel wool and rub it over the wood. The more you steel wool your wood, the more antiqued/aged it becomes). But, it actually looks surprisingly good! (Now if only the mirror wasn't cracked).
(And, on a side note, the red blanket that's on our bed in the picture doesn't actually belong there. My colour scheme in our bedroom is grey and aquamarine/bluey...the comforter that matches the pillows on the bed is too hot in the summer, hence the red blanket...)
I bought new curtains so that our room wouldn't feel so heavy and dark (because everything that belongs on our bed actually came in a bed in a bag- including curtains), and I love how airy and summery it feels. These were clearance at Fields, because they were (are) closing out. I also bought brown ones, which are still yet to be hung in my living room. Maybe one day! Mayyybeee...when I get the custom shelving units that my dad is kindly going to build for me, which will be placed on either side of my living room window! That would be the most opportune time! (Pictures will follow when said project is actually completed!)
OK, back on task. The strips of patterned paper are both Recollections (My Favorite Things), and the buttons are once again miscellaneous. The title work was stamped using Basic Black ink (SU), and the banner sticking out from the side of the picture is hidden journalling. The scalloped border punch is Martha Stewart.
And, speaking of visits, my sister and brother in law were down for the night, as I mentioned in yesterdays post. I got spoiled again today! The kids and I had a rotten sleep last night- we were up every hour overnight, for one reason or another. Just before noon, J noticed me trying to stay awake while we were hanging out in the living room. The kids began asking for lunch, and he offered to make the mac and cheese while I went for an hours' nap. Bless his heart! I actually got to sleep for an hour and fifteen minutes, and it was the most well spent (personal) hour I've had all week!
I'm thinking that I'll have to go out and buy them some hershey's kisses and make them a card to thank them for their kindness to me over the last two days. Its really meant a lot! (Though, I'm sure they feel indebted to us because we're taking their kitty in as our own until further notice). On a brighter note, make sure you watch for more layouts with Neruda (kitty) in them from now on...once she gets accustomed to the kids and our house, I'm sure there'll be a lot of her! To help you remember who I'm talking about, here she is:

Saturday, August 25, 2012
Blessing
I had the first night in eons tonight to finally just sit and relax during the kids' regular bath time. It was an absolute dream come true! And, the icing on the cake--the living room was tidied up for me while I ran out to the grocery store to pick up hamburger buns so I could make supper for all of us!
No, my husband didn't do it.
My person- sweet, incredible, so-blessed-to-know SISTER did it for me.
I've told her a couple times already tonight a sincere, heartfelt thank you, but I don't think she fully understands just how sincere and heartfelt my thank you's are! I mean it from the bottom of my {broken and exhausted} little heart.
It was a GREAT day for me today!

Its reveal day over at Lets Capture Our Memories, so I've got a new sketch and layout to share with you. But, since I still haven't figured out how to copy and paste the sketch into a blog post yet, you'll have to navigate yourself over to their blog to see for yourself- and in the process, check out everyone else's awesome takes on it. Pure genius, every single one of them!
This has got to be one of my most favourite sketches to date to work with. It came together remarkably quickly, and its so versatile and easy to manipulate. There's tons of room for creativity with this one- and if you like lots of white space in your projects, then this is the sketch for you!
On this particular layout, I used the script cuttlebug embossing folder to spruce up my orange piece of card stock- and for an even bigger bang, I lightly inked the raised portions using a sponge dauber. (I used Stampin' Up's More Mustard for the inking).
I also wanted a little bit of sparkle on this layout. I took another Cuttlebug embossing folder (one of the mini's that came along with the package when I bought it), and coloured the negative space in with my Stampin' Up water colour pencils (in red). Then I blended it in using the blender pen. The raised portions I filled in with my Martha Stewart glitter glue, then sprinkled my Martha Stewart Crystal Fine glitter powder onto. Let it dry, and you've got an adorable, glittery postage stamp that helps reinforce your title work- the girls love their horsey rides! I also glittered up the title work using the same glitter mentioned above.
The arrow is K&Co, and the 'washi tape' I created myself, using regular tape (not scotch, but the other kind- sorry brain fart) and Cherry Cobbler (SU) ink to paint it; then, I went back over it using Whisper White ink (SU) with a lined, miscellaneous stamp I've had around for ages. It didn't quite work to my liking, but I wound up loving its effect, anyways! Its obvious that it's lined, but with varying shades of red.
Lastly, just because I couldn't refuse, I added some pearl rhinestones for a little bit of glam.
So, there you have it- sketch 146 from LCOM! Hope you like it, and if you do use the sketch, don't forget to link up your project to Lets Capture Our Memories' blog post- we'd love to see how it inspires you, too!
~a
No, my husband didn't do it.
My person- sweet, incredible, so-blessed-to-know SISTER did it for me.
I've told her a couple times already tonight a sincere, heartfelt thank you, but I don't think she fully understands just how sincere and heartfelt my thank you's are! I mean it from the bottom of my {broken and exhausted} little heart.
It was a GREAT day for me today!

Its reveal day over at Lets Capture Our Memories, so I've got a new sketch and layout to share with you. But, since I still haven't figured out how to copy and paste the sketch into a blog post yet, you'll have to navigate yourself over to their blog to see for yourself- and in the process, check out everyone else's awesome takes on it. Pure genius, every single one of them!
This has got to be one of my most favourite sketches to date to work with. It came together remarkably quickly, and its so versatile and easy to manipulate. There's tons of room for creativity with this one- and if you like lots of white space in your projects, then this is the sketch for you!
On this particular layout, I used the script cuttlebug embossing folder to spruce up my orange piece of card stock- and for an even bigger bang, I lightly inked the raised portions using a sponge dauber. (I used Stampin' Up's More Mustard for the inking).
I also wanted a little bit of sparkle on this layout. I took another Cuttlebug embossing folder (one of the mini's that came along with the package when I bought it), and coloured the negative space in with my Stampin' Up water colour pencils (in red). Then I blended it in using the blender pen. The raised portions I filled in with my Martha Stewart glitter glue, then sprinkled my Martha Stewart Crystal Fine glitter powder onto. Let it dry, and you've got an adorable, glittery postage stamp that helps reinforce your title work- the girls love their horsey rides! I also glittered up the title work using the same glitter mentioned above.
The arrow is K&Co, and the 'washi tape' I created myself, using regular tape (not scotch, but the other kind- sorry brain fart) and Cherry Cobbler (SU) ink to paint it; then, I went back over it using Whisper White ink (SU) with a lined, miscellaneous stamp I've had around for ages. It didn't quite work to my liking, but I wound up loving its effect, anyways! Its obvious that it's lined, but with varying shades of red.
Lastly, just because I couldn't refuse, I added some pearl rhinestones for a little bit of glam.
So, there you have it- sketch 146 from LCOM! Hope you like it, and if you do use the sketch, don't forget to link up your project to Lets Capture Our Memories' blog post- we'd love to see how it inspires you, too!
~a
Sunday, August 19, 2012
Got Sketch?
Did you hear? I'm having a giveaway! For more details, scroll down, or click on this link to head straight over there!

I based this layout on sketch 68 over at Got Sketch? I thought it would perfectly highlight the damage done to one of the girls' toys after being thrown down the stairs. I am not sure, exactly, what possesses the kids to throw things down there, other than to see what happens. Oh, the things I find down there! My mop and bucket, dish towels, shoes, toys--you name it, it has been thrown over the bannister and down the stairs.
We had a fabulous weekend with my dear friend visiting. We got a lot of visiting in, even with the kids around, and we learned that the jet boat races are incredibly
Annnnd, I've learned that the girls think there's an 'uncle' since I was calling A auntie A all weekend. Oops! How do you explain to little ones that its possible to have an 'auntie', even if there's no 'uncle' yet??? And, they're right to suppose that when there's an auntie, there should be an uncle. The only time we've referred to an auntie and uncle is when my sister and brother in law are around. Must be a tough thing to be a kid!!
So--nothing too exciting should be happening now until the end of the month- when A and I have our next hair appointment scheduled, and our niece gets married! After that, (apparently), the kids will be joining their grandparents on one last camping trip of the summer, and hopefully the weather will have cooled off {considerably} by then!
Thanks for dropping by,
~a
Monday, August 6, 2012
Heinz 57

LIttle cousin C

Addison- this was taken Friday afternoon, just after we got to the lake. Grandma and Grandpa were the only ones there- it was a nice, quiet visit before everyone else arrived. The first thing Addison did was begin playing hide and seek. She counts, '1, 2...6, 7, 8, 9, 10!'

Addison played like this all weekend. She's always happy to sit on her own and 'make'.

Maren was playing a game with Grandma when we first got to the campsite.

Addison enjoying riding in their dinghy. Thanks to B for snapping some pictures for me.

Maren *really* enjoying the dinghy ride. She almost fell to sleep!

Maren pulling her boat around all on her own. She was pretty brave with that life jacket on- she'd go out fairly deep- at least chest height- before she'd start losing her balance. Daddy rescued her a time or two before she went face first into the water. They (both girls) certainly enjoyed the lake, though. We were down there for a good solid couple of hours on Saturday afternoon.

Maren 'driving' grandpa's motorboat.


Addison 'driving' grandpa's motorboat.

One of S's wedding shower gifts- an apron that all of the family signed. I thought it would be cute to let Addison and Maren 'sign' her apron, then I 'translated' what they wrote.

Better view of the apron.
We've decided that the kids are going to accompany grandma and grandpa on another camping trip- one by themselves- in a few weeks' time (the end of August). And, its got me stupidly excited.
Why?
I'm in 'home improvement' mode again. Yup. I'm gonna paint. I'm a go-getter- lets see if I've bitten off more than I can chew- I'm going to paint the half bath and the hallway upstairs. I'm going to DIY a bookshelf. I'm also going to sort through the kids' toys and donate a lot of it. I've been on the net, researching colours to paint the girls' bathroom (make it kidsy, but also classy enough to be used as an adult bathroom), and also came across a new colour to try out in the hallway. Kyle doesn't really want to use the same yellow in the hallway that I did in the kitchen, but I do for continuity's sake. I also think it will brighten up the hallway, because it feels really dark and murky. I looked at other colours, anyways, and I think I've come up with a compromise: I told him that if the hallway is going to be painted something other than what I want, then its going to stay somewhere in the same family that its currently painted (which is beige). I came across two colours (Behr brand): winter garden and/or willow herb. They sound pretty, right? Serene and calming- which I like. Both colours are beige, but are heavy on the green- so it will coordinate with both my living room (which is a beautiful olive kind of green) and kitchen, which is yellow, but heavy on the green. (Its seaweed something or rather). I'm stoked. Now I need an excuse to head into Edmonton while the kids are gone to pick up the paint.
Eek! I love home improvements!!

I suppose I have a little of everything tonight. I whipped this card up in mere minutes on Saturday morning for S, our niece. She'll be getting married on September 1, but her wedding shower was at the camping trip this weekend. I had already made one for her from myself and Kyle, but I made one for my MIL to give her. I also picked up her shower gift for the both of us and then slid theirs in along with the card I made for MIL to give to S. (Long winded and confusing? Yeah, sometimes- that's how I roll).
It was very simple and easy to make. (It would have to be if I got it done in 20 minutes or less!) I used Whisper White Ink (SU) and my large polka dot stamp to stamp the bottom half of the card stock base. The green card stock strip 3/4 of the way up is scraps (Autumn Leaves brand), and the white tag is Martha Stewart. The blue and green one thats inset is unknown. The wedding bells- Sandy Lion (Dollar Store), and I also used the mini phrases from SU for the 'celebrate' sentiment. I stamped that with Old Olive Ink (SU). Lastly, so that the white of the MS tag wasn't so stark and austere, I inked it with a sponge dauber and Old Olive Ink, so that it would blend in a bit better!
Tune in tomorrow for more goodies!
~a
Tuesday, July 31, 2012
Sketch 22 and Another Storage Idea

Its reveal day! Yipee! Here's another layout I made of us enjoying the play park over Fathers Day. Auntie and Uncle both helped Addison down the slide because she's afraid of going down by herself. When she's ready to come down, she'll tell us she 'needs a hand'. Head on over to Heather's blog to check out sketch 22 (this time its a two pager, but I only kept mine one), and see all the beautiful work the other girls have done. You won't be disappointed!
And, once again, this layout is made completely with scraps, minus the purple card stock everything is mounted on.

What a fabulous way to store your brads and eyelets! I think this is ingenious, and I can hardly wait to hit the store to buy another one of these! Now I have an excuse to go out and buy more brads and eyelets- with such a cute and smart way to store them, how could you not?! (I may or may not cover the Rexall logo on the front- just to make it prettier!!)
(The inspiration for this came from BHG. You can also find it on my Pinterest, under 'All Things Scrappy').
~a
Monday, July 23, 2012
Near the End
Phew- what an incredible day, weather wise today! There was severe weather all over the place. Did you have any severe weather?

For something a little different today, this layout is a scrap lift of Heathers' We Never Get Any Sleep! layout. I absolutely adored the shapes of her photos- love the retro, flower/leafy look the rounded edges on the opposite corners looks. Instead of going with bold, dark prints like Heather did, I wanted to mimic the look of the grass in the bottom picture- bright green, contrasted with the white fluff of dandelions. Doesn't it just scream summer?!
Once again, I turned to the Sweet Nectar paper pad that's been lurking in the depths of my stash, and recently popping up on a lot of my projects. Some scraps were used, like the punched strip of floral paper, and the yellow card stock its matted on. (On that piece of yellow card stock, I used my 'baby's breath' cuttlebug embossing folder for some interest and dimension).
I can't remember where I got the blue buttons from, but the 'free' sticker at the top is K&Co, and the little 'sweet' sticker at the bottom (nestled next to the flowers) is also K&Co. I made the flowers myself: they're easy peasy!!
All you do is take your circle punch (or punches), punch as many circles as you like; crumple them, then layer them. Voila, instant flowers! The punch sizes I used were .5" and 1.5" by Creative Memories. The pearl rhinestones are Recollections. And, to create a 'mat' that the photo's are adhered to, I just took a black pen and drew a border around the outside edge, mirroring the same shape the patterned paper/photo mats are.
Once again, the girls were playing at the park. These pictures were taken near the end of our excursion there. I wasn't near enough to them to know fully what was going on, but I imagine they were playing' super bunny...to the rescue!' Addison's arms spread out beside her suggests that (I'll give you a little hint: her arms are mimicking a cape!!) Hee isn't that the darlingest thing ever??!
Yes, a mother in love. For sure.
Tomorrow, I'll have one last layout from our play date at the park over Fathers' Day. After that, there'll be some pictures from Father's Day.
Stay tuned!!
~a

For something a little different today, this layout is a scrap lift of Heathers' We Never Get Any Sleep! layout. I absolutely adored the shapes of her photos- love the retro, flower/leafy look the rounded edges on the opposite corners looks. Instead of going with bold, dark prints like Heather did, I wanted to mimic the look of the grass in the bottom picture- bright green, contrasted with the white fluff of dandelions. Doesn't it just scream summer?!
Once again, I turned to the Sweet Nectar paper pad that's been lurking in the depths of my stash, and recently popping up on a lot of my projects. Some scraps were used, like the punched strip of floral paper, and the yellow card stock its matted on. (On that piece of yellow card stock, I used my 'baby's breath' cuttlebug embossing folder for some interest and dimension).
I can't remember where I got the blue buttons from, but the 'free' sticker at the top is K&Co, and the little 'sweet' sticker at the bottom (nestled next to the flowers) is also K&Co. I made the flowers myself: they're easy peasy!!
All you do is take your circle punch (or punches), punch as many circles as you like; crumple them, then layer them. Voila, instant flowers! The punch sizes I used were .5" and 1.5" by Creative Memories. The pearl rhinestones are Recollections. And, to create a 'mat' that the photo's are adhered to, I just took a black pen and drew a border around the outside edge, mirroring the same shape the patterned paper/photo mats are.
Once again, the girls were playing at the park. These pictures were taken near the end of our excursion there. I wasn't near enough to them to know fully what was going on, but I imagine they were playing' super bunny...to the rescue!' Addison's arms spread out beside her suggests that (I'll give you a little hint: her arms are mimicking a cape!!) Hee isn't that the darlingest thing ever??!
Yes, a mother in love. For sure.
Tomorrow, I'll have one last layout from our play date at the park over Fathers' Day. After that, there'll be some pictures from Father's Day.
Stay tuned!!
~a
Sunday, July 22, 2012
Prepare to be Amazed!
On a whim, I brought out one of my scrapbook albums this afternoon, and showed it to the girls. I never imagined that at this age (2.5) they would be so into looking at the pictures in my albums. In total, we browsed through 4 entire scrapbook albums! And, I've concluded that I need to do it a little more often- so they learn the faces of the people in them, and a little bit about who they are. In that respect, its better to start now than when they are older. For example, there's a few layouts with my Oma- the girls' great Oma- and they wouldn't know who she is from Adam. They have met her- when they were tiny little infants, but they don't remember her. And, they'll never know her intimately like I did growing up. But, they can learn about her and love her through the pages that are dedicated to her.
On another note, I'm deeply touched that what I've been dedicated {obsessively} to working on for my family and those still to come, is so special to the girls. Already. I was almost moved to tears this evening when I was talking with Kyle about it! Of course they would appreciate it, but in my mind, that appreciation would be many years down the road. I never thought that it would be this soon. Wow. Just. Wow!! At least I know (thankfully) none of what's in those albums is in vain. KWIM???!
I have another layout to share tonight:

This was such a fun layout to make! Its based on the Monthly Sketch Challenges' Bonus Sketch for week 3, which you can find right here. I flipped the sketch upside down and turned it backwards so that it would work better with the photo I chose to scrapbook.
And, the picture I chose is still from the Father's Day weekend bash. Here, Auntie is walking with Dear Maren in her arms. I just adore this picture of the two of them! And, I love that she's taking such a keen interest in spending time with them. But, how could she not? She's my person, after all! She helped bring them into the world- by extension, they're almost like her own children!
I began thinking that when we look back on this picture, we're going to wonder exactly how old Maren was when this picture was taken. So, in the journalling spot, I jotted down the magical number (which is 29 months old. But, I realized that's a typo after I got it scanned. She's actually 28 months old in this picture. My bad!! I still have to fix that).
All the papers I used are K& Co, but not from the same lines. (The one that the title is matted on is from the 'best of' paper pad, and the rest are from the Brenda Walton Designer paper pack). The black card stock is Recollections, I think.
Have a great night, everyone! I'm off to work on another layout before heading off to bed.
~a
On another note, I'm deeply touched that what I've been dedicated {obsessively} to working on for my family and those still to come, is so special to the girls. Already. I was almost moved to tears this evening when I was talking with Kyle about it! Of course they would appreciate it, but in my mind, that appreciation would be many years down the road. I never thought that it would be this soon. Wow. Just. Wow!! At least I know (thankfully) none of what's in those albums is in vain. KWIM???!
I have another layout to share tonight:

This was such a fun layout to make! Its based on the Monthly Sketch Challenges' Bonus Sketch for week 3, which you can find right here. I flipped the sketch upside down and turned it backwards so that it would work better with the photo I chose to scrapbook.
And, the picture I chose is still from the Father's Day weekend bash. Here, Auntie is walking with Dear Maren in her arms. I just adore this picture of the two of them! And, I love that she's taking such a keen interest in spending time with them. But, how could she not? She's my person, after all! She helped bring them into the world- by extension, they're almost like her own children!
I began thinking that when we look back on this picture, we're going to wonder exactly how old Maren was when this picture was taken. So, in the journalling spot, I jotted down the magical number (which is 29 months old. But, I realized that's a typo after I got it scanned. She's actually 28 months old in this picture. My bad!! I still have to fix that).
All the papers I used are K& Co, but not from the same lines. (The one that the title is matted on is from the 'best of' paper pad, and the rest are from the Brenda Walton Designer paper pack). The black card stock is Recollections, I think.
Have a great night, everyone! I'm off to work on another layout before heading off to bed.
~a
Saturday, July 21, 2012
DIY Chevron
I've been sitting on this lo for a while, and I've just been itching to share it with you!
I came across a really neat tutorial over at Creating Keepsakes' Blog on making your very own chevron design from your stash! What a great idea--and Ilove adore how it looks! In addition to making each letter in my titles blocked (another favourite technique), you'll be finding a lot of this in my projects, as well!
One thing I learned while trying to figure out how to do this: the size of paper doesn't matter. In this particular project, each piece of patterned paper to make up the sides of the chevron are 1'(w) by 3'(l). The longer and wider they are, the higher and deeper your chevrons become! Also, remember to alternate which sides you fold down with each strip of patterned paper you use. It took me quite a while to figure out why it wasn't working...it wasn't until the first half were adhered to the card stock background that the little proverbial lightbulb came on.
So, to explain a little more precisely: with your first piece of patterned paper, fold down the top left corner, so it makes a triangle shape, then fold the bottom right edge up; on your next strip of patterned paper, fold the bottom left portion up, and the top right portion down, always making little triangles. When you fit the folded edges together, it should make the chevron pattern. (If I am not making sense, head on over to Creating Keepsakes--it'll make sense there).

(You can see a ton of fold lines in this strip of patterned paper because I was using it to practice)

Top left corner folded down

Bottom right corner folded up

This is the second strip of patterned paper; fold the bottom left portion up

Fold the top right portion down

When both strips of patterned paper are aligned, you've got the chevron pattern! Voila!
And, here's the masterpiece I made using this technique:

This was made using sketch #141 over at Let's Capture These Sketches. Definitely head over there and see what the girls have done with this beautiful sketch!
If you make any projects using this technique, send me the link so I can see too! I'd love to see how you use it. And, don't forget to drop by Creating Keepsakes and link your project to their blog, too!
I came across a really neat tutorial over at Creating Keepsakes' Blog on making your very own chevron design from your stash! What a great idea--and I
One thing I learned while trying to figure out how to do this: the size of paper doesn't matter. In this particular project, each piece of patterned paper to make up the sides of the chevron are 1'(w) by 3'(l). The longer and wider they are, the higher and deeper your chevrons become! Also, remember to alternate which sides you fold down with each strip of patterned paper you use. It took me quite a while to figure out why it wasn't working...it wasn't until the first half were adhered to the card stock background that the little proverbial lightbulb came on.
So, to explain a little more precisely: with your first piece of patterned paper, fold down the top left corner, so it makes a triangle shape, then fold the bottom right edge up; on your next strip of patterned paper, fold the bottom left portion up, and the top right portion down, always making little triangles. When you fit the folded edges together, it should make the chevron pattern. (If I am not making sense, head on over to Creating Keepsakes--it'll make sense there).

(You can see a ton of fold lines in this strip of patterned paper because I was using it to practice)

Top left corner folded down

Bottom right corner folded up

This is the second strip of patterned paper; fold the bottom left portion up

Fold the top right portion down
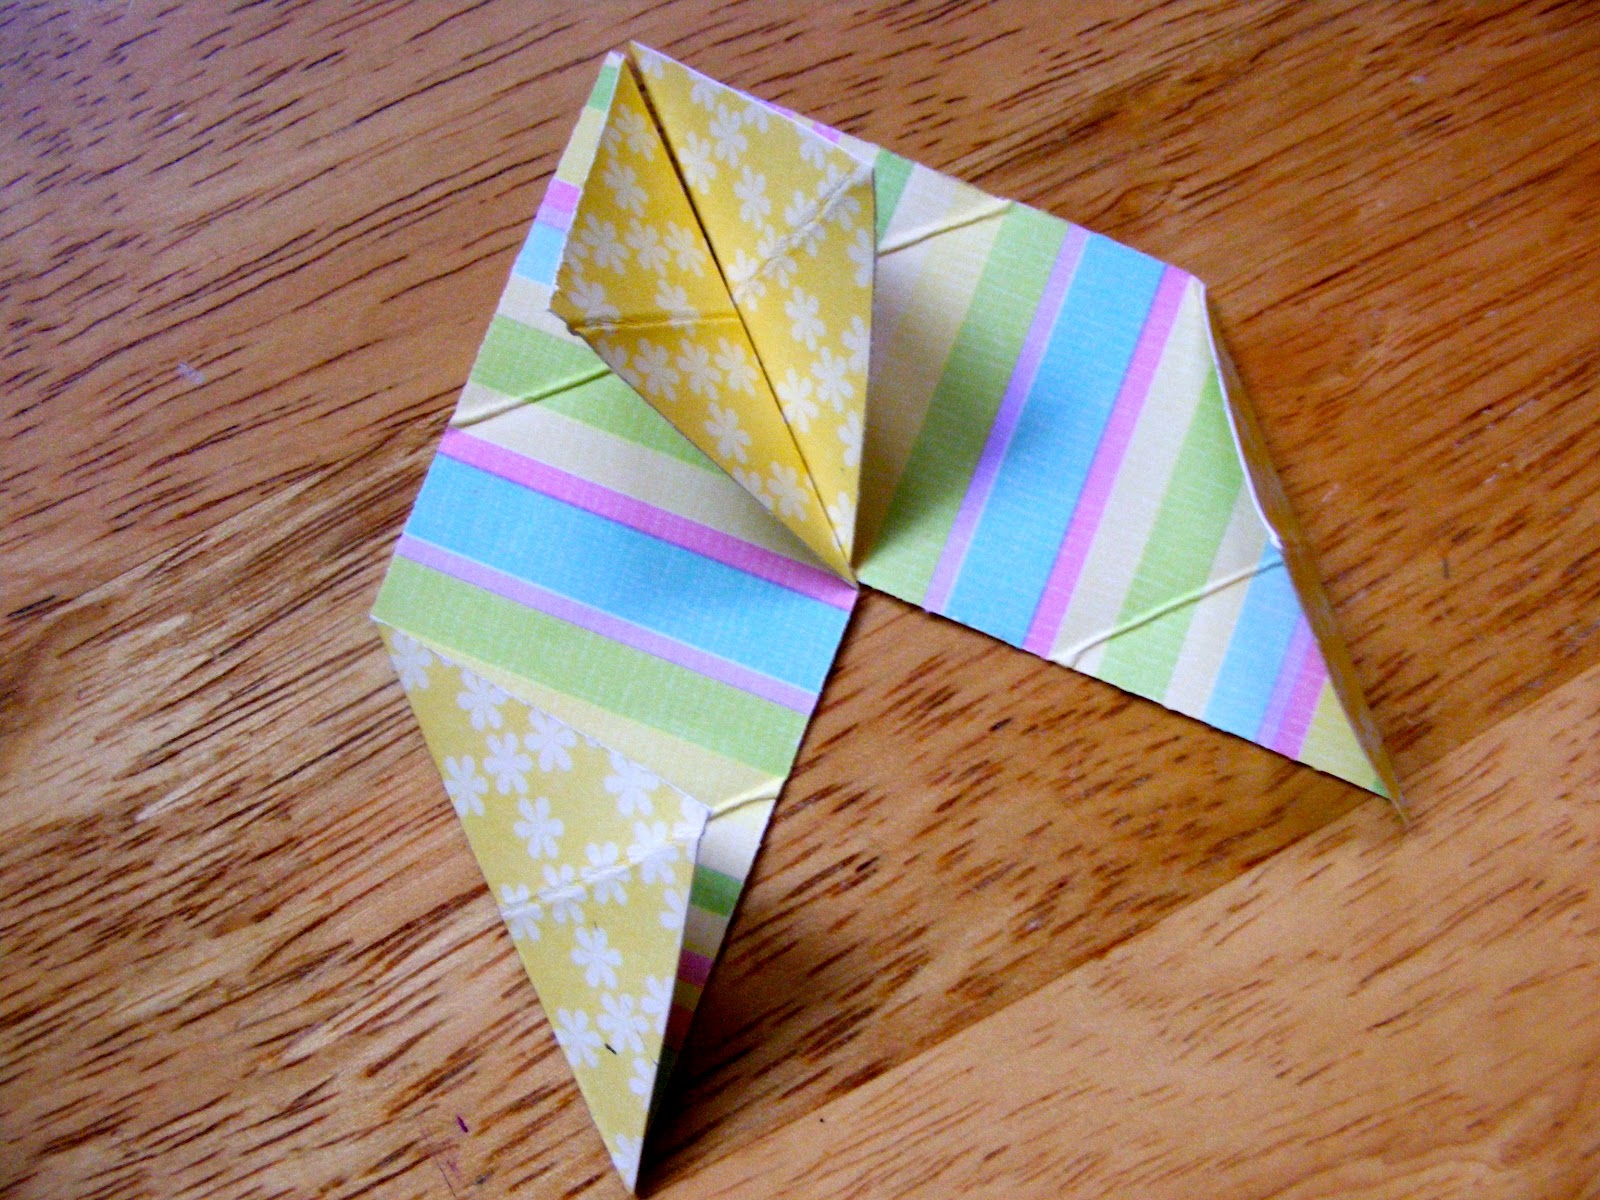
When both strips of patterned paper are aligned, you've got the chevron pattern! Voila!
And, here's the masterpiece I made using this technique:

This was made using sketch #141 over at Let's Capture These Sketches. Definitely head over there and see what the girls have done with this beautiful sketch!
If you make any projects using this technique, send me the link so I can see too! I'd love to see how you use it. And, don't forget to drop by Creating Keepsakes and link your project to their blog, too!
Friday, July 20, 2012
Once, Many Moons Ago...
Thought I'd share a fun layout with you today!
While auntie and uncle were down here last celebrating Fathers' Day with us (you may remember that I've been referencing that a lot lately!!) we played at the park with the kids until their bedtime. Auntie and daddy got the bright idea to try and go down the twisty slide like the kids (auntie, mainly as a way to encourage the girls to go down it with her. They still think its a pretty scary thing!!!) Daddy- just because he was showing off. LOL
He did mention that we may need to call 911 if he got stuck. Thankfully--he didn't! It was a tight squeeze, though.
 Hilarious, right?
The sketch I used for this layout was done by Melissa over at What's Scrappenin'? You can also find her over at scrapbook.com. I did this for the Monthly Sketch challenge (which is where the sketch came from), week 3.
I did a lot of stamping on this one, and everything that's stamped or inked was done using SU's chocolate chip. The stamps I used on the grey card stock are Autumn Leaves (Walmart), the journalling spot is also Autumn Leaves; the ties and the 'best dad ever' stamps are all from SU's Best Dad Ever set.
The blue gingham pp is SU (from many, many moons ago), and the alpha stickers in my title work are probably also from Walmart. (They're half used up- from my MIL...I am not sure where they came from!) I fussy cut the banner on which my title work is adhered.
There you have it! Simple, but loads of fun! (And a laugh or two)
ANother weekend is here. We are laying low this weekend. What are your plans?
While auntie and uncle were down here last celebrating Fathers' Day with us (you may remember that I've been referencing that a lot lately!!) we played at the park with the kids until their bedtime. Auntie and daddy got the bright idea to try and go down the twisty slide like the kids (auntie, mainly as a way to encourage the girls to go down it with her. They still think its a pretty scary thing!!!) Daddy- just because he was showing off. LOL
He did mention that we may need to call 911 if he got stuck. Thankfully--he didn't! It was a tight squeeze, though.

The sketch I used for this layout was done by Melissa over at What's Scrappenin'? You can also find her over at scrapbook.com. I did this for the Monthly Sketch challenge (which is where the sketch came from), week 3.
I did a lot of stamping on this one, and everything that's stamped or inked was done using SU's chocolate chip. The stamps I used on the grey card stock are Autumn Leaves (Walmart), the journalling spot is also Autumn Leaves; the ties and the 'best dad ever' stamps are all from SU's Best Dad Ever set.
The blue gingham pp is SU (from many, many moons ago), and the alpha stickers in my title work are probably also from Walmart. (They're half used up- from my MIL...I am not sure where they came from!) I fussy cut the banner on which my title work is adhered.
There you have it! Simple, but loads of fun! (And a laugh or two)
ANother weekend is here. We are laying low this weekend. What are your plans?
Wednesday, July 18, 2012
Utter Determination
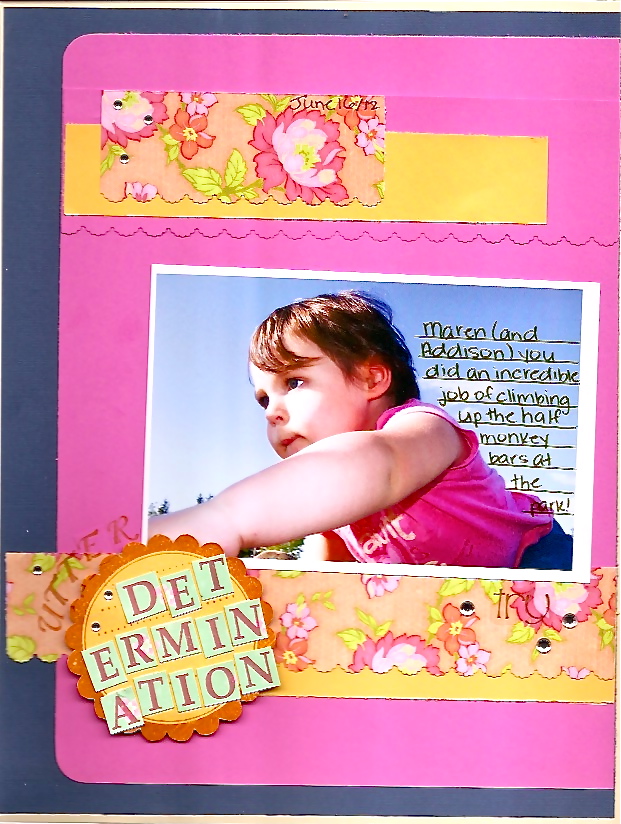
A few weeks back, my family came out to celebrate Fathers' Day. Maybe it was a month ago, already. My sister and brother in law decided to come out early to celebrate, and I'm glad they did. We had a lot of fun hanging out at the park with the kids just before their bedtime. It was the perfect way for them (auntie and uncle) to play with the kids.
While we were there, Maren decided to climb up this monkey bar thing that starts at the ground and curves upwards towards the main play structure. I'm not really sure what to call it, so I've dubbed it the 'half monkey bars'. I could hardly wait to get this picture onto paper and into the girls' scrapbook album. The look of sheer determination/concentration on Maren's face is absolutely incredible. I kind of think its one of those pictures you'd find in a motivational/inspirational type poster hanging on a wall somewhere. Yeah, I think this shot is that good. Its also one of the pictures that's really making me think that taking a photography class would be so fun and rewarding.
This particular layout is based on the monthly sketch challenge over at Scrapbook.com. Its the bonus sketch for week 2, mind you, but its the only one I can share with you right now, because everything else I've been working on is for DT's. On Friday I'll have one of them to share...I can hardly wait for it. Eek!
The floral paper is K&Co (Sweet Nectar), and they're scraps; so is the yellow card stock that's matted underneath it. The pink and beige card stock (on which the navy blue is matted on) are all Autumn Leaves (Walmart) card stock. I think the navy card stock is from DeSerres, my LSS. If you haven't been there before, you should check them out- in store at West Edmonton Mall, or online. They've got everything for your crafty/hobby needs! Its a pretty neato store. Thanks to a dear friend for the heads up!
The little bit of punch work on the pink card stock strip is with a Martha Stewart scallop punch. Rhinestones are Recollections.
Monday, June 18, 2012
FUN
Oh my word, we survived another busy weekend! Phew!
Father's day was an absolute riot. My family (sister, BIL, mom and dad) spent the weekend with us, and thankfully it was beautiful! We took the kids to the park Saturday night (after my sister and BIL arrived), and Sunday afternoon, we played in the yard until supper was ready. I promised dad that he wouldn't have to help us do any work around the house this visit- and that promise was kept! Ha!
I hope you don't tire of my picture posts. I love sharing them; in fact, I can't get enough of them!
So, without further adieu, here are my faves!!:

Addison

auntie trying out the twisty slide

auntie pushing Maren in the swing

uncle and Addison

I love the look of concentration, uncertainty, determination in Maren's face! She did awesome climbing up the half-monkey bars

Addison coming down the slide, I think

daddy trying out the twisty slide. ROFLOL.....thank goodness we didn't have to call 911 or anything!!

Addison holding auntie and uncle's hands

auntie and uncle helping Addison down the slide. (She loves it, but is afraid of going down without help)

auntie and Maren

auntie

Addison

Addison pushing their stroller

"SUPER BUNNY--TO THE RESCUE!!!"

love, love, love

love, love, love even more!!!
So, this wound up being quite a long post. And, there's still more to share, so I think I'll just split it into two, possibly three posts. (I took over 240 pictures!!) over the last three days, so please bear with me!!
I'm by no means a photographer, and I really don't consider myself a good one although I do try hard, so I get pretty excited when I come up with ones that I find are 'exceptional'. I would like to take a photography class. I just started thinking about it this weekend! Maybe!! Anyways, I can hardly wait to edit these last two a bit more...of all the pictures I took, these two are my absolute.faves.
Hope you had a great weekend. See you again real soon!
Father's day was an absolute riot. My family (sister, BIL, mom and dad) spent the weekend with us, and thankfully it was beautiful! We took the kids to the park Saturday night (after my sister and BIL arrived), and Sunday afternoon, we played in the yard until supper was ready. I promised dad that he wouldn't have to help us do any work around the house this visit- and that promise was kept! Ha!
I hope you don't tire of my picture posts. I love sharing them; in fact, I can't get enough of them!
So, without further adieu, here are my faves!!:

Addison

auntie trying out the twisty slide

auntie pushing Maren in the swing

uncle and Addison

I love the look of concentration, uncertainty, determination in Maren's face! She did awesome climbing up the half-monkey bars

Addison coming down the slide, I think

daddy trying out the twisty slide. ROFLOL.....thank goodness we didn't have to call 911 or anything!!

Addison holding auntie and uncle's hands

auntie and uncle helping Addison down the slide. (She loves it, but is afraid of going down without help)

auntie and Maren

auntie

Addison

Addison pushing their stroller

"SUPER BUNNY--TO THE RESCUE!!!"

love, love, love

love, love, love even more!!!
So, this wound up being quite a long post. And, there's still more to share, so I think I'll just split it into two, possibly three posts. (I took over 240 pictures!!) over the last three days, so please bear with me!!
I'm by no means a photographer, and I really don't consider myself a good one although I do try hard, so I get pretty excited when I come up with ones that I find are 'exceptional'. I would like to take a photography class. I just started thinking about it this weekend! Maybe!! Anyways, I can hardly wait to edit these last two a bit more...of all the pictures I took, these two are my absolute.faves.
Hope you had a great weekend. See you again real soon!
Subscribe to:
Posts (Atom)