I've been trying to find innovative ways to store my embellishments, especially my sticker embellishments. I've got my sticker letters cleaned up, as I've already mentioned. But, I wasn't satisfied with the rest of my sticker storage.
I hopped onto google and typed in a query for embellishment storage for a small space, and I came across separating everything into sheet protectors and then storing them in a 3-ring binder. Ingenious! (But, I need to head out and find more 3-ring binders, now. I had only one empty one kicking around). Unless the girls in the office at Total have binders they want to get rid of? I'll have to ask Kyle! He brought home an armful of page protectors that they were otherwise going to throw out. I told him it was unnecessary (at the time), because I foresaw no use for them. Hum. I was wrong. On the other hand, what a shame to waste perfectly good page protectors! There was nothing wrong with them!
Now, happily, there are two empty drawers in the caddy that stored my stickers, sticker letters, vellum, rub-ons, etc.
There are two boxes devoted to each letter in the tackle box storage, though some of them (like u,v,w- which are all stored together) need three or more spaces. I put all like letters together: b and d, i and j and l, m and n, p and q, u and v and w, for these reasons: 1) save space, and 2) in case I am short a particular letter, like i, for instance, I can use the j or l to make another 'i'.
I'm not quite sure yet how well this will all work, but I'm willing to give it a try. Its a great solution to my problem.
There's three other things I am going to implement in my haven: small clear jars to store short strips of ribbon, and the shelving unit that needs to be put up on the wall is going to display the block stamps that I use on a regular basis- my "go-to's" if you will...Kyle has homework when he gets home tonight- as long as he isn't too late! And lastly, a pill box/blister pack to store brads and eyelets. Ingenious! Thanks to BHG for such fantastic storage ideas. I've got to remember to add that to the ever expanding grocery list, too.
(on a total side note-- the snow birds just flew overhead. The Whitecourt airshow is happening this weekend, and they must be practicing. I quickly scooted into the living room, and saw them in formation flying overtop the houses across the street. Oh, they must be coming around again... I hear them once more! Keep your eyes peeled for pictures from the air show--they'll be coming either Sunday or early next week. We are heading out to the show with my parents on Saturday).
Well, that's all I've got to share with you today. Hopefully you find something here inspiring!
~a
Thursday, July 26, 2012
Wednesday, July 25, 2012
Something Old, Something New
Hi everyone!
Tonight, I've got a card to share rather than a layout. My MIL texted the other day to let me know that our niece, who is getting married the first of September, is having her wedding shower at our family reunion (which is coming up August long weekend). So, in roughly a week.
I don't have much wedding themed stuff in my stash, but I do have some, and I began thinking about what items I would want to use to create a card for her with. There was a tag that I played around with for quite some time, but it just didn't feel right to me. So, I dropped it, and tried another one. And, there it was! I find it funny how sometimes the smallest thing can make the biggest difference!
The die cut frame was cut with the Sweet Shop Cricut cartridge (as was the oval inside the frame mat). The wedding dress form is K&Co and the gold patterned paper is Martha Stewart. For a little bit of bling, I added white rhinestones around the waist, and clear and a black rhinestone to mimic a necklace. The joy stamp is from SU (mini phrases) and was stamped with Basic Black ink. All the rhinestones are Recollections.
I still need to make her an actual wedding card, but I'll save that for after our camping trip. There's other goodies that needs to be completed in the mean time!
Has anyone ever attempted making homemade croutons? (Hows that for a change of topic?!) The idea dawned on me earlier this week because I noticed the girls have begun eating around the bread crust. Rather than wasting it, I'm going to make croutons!! Since the reunion is coming up fairly quickly, I began thinking that it would be nice to bring out a nice caesar salad for everyone to munch on one day for lunch- that would be the perfect excuse to use up the homemade croutons I'm going to make. (I've just been saving them in a ziploc baggy and freezing them until a time that I would need them). The place we'll be camping is close enough to home that we'll be coming home every night, so this shouldn't be too hard to do. Hopefully!
And, speaking of food, I'm not sure if I mentioned this or not, but I've been thinking for a while that I wanted to try spinach in my smoothies- at least, mixing more veggies into the fruity mix. (Have I even mentioned that I'm on a huge fruit smoothie kick these days??) If not, I so am!! I did buy spinach, and I froze it (so that it wouldn't go bad, because otherwise it would, in this house!!) I can't even taste it. Neither can the girls, and as of today, neither can Kyle. Ding, Ding, Ding! Bonus points for mama! I'm pretty pumped. The girls don't even realize they're eating something super healthy. That makes it even better!
Why am I so insanely crazy about something that's so not something to get excited over?
After feeling disappointed in my appearance for quite some time- especially more so since the twins came along, I've decided to commit to do something about it. The first step actually began with the fruit smoothies. I figured if I could make it a regular thing in my household, it would help all four of us (but unfortunately its just the girls and I at the moment), get the nutrition we need. Because, lets face it, we don't always eat as healthy as we should. Then, I bought the girls vitamins. Which, is great, but I've learned that if Addison wants one, she'll ask for one. Otherwise, don't bother. She'll carry it around with her until she eventually drops it and forgets about it. Maren loves them, on the other hand. To her, its candy, and candy is goooood. Now I need to go out and find vitamins for Kyle and I.
The biggest change, though, is my own eating habits, and (previously) the lack of exercise. I'm starting to ache in strange places, for no apparent reason at all, and all I can think is at my age, I shouldn't be feeling this way. So, I'm changing it. This is still very, very new- as in only three days old, but I am more motivated now than I have been my entire life. I want to feel better about myself, and my appearance! I asked Kyle to hold me accountable to what I eat and when, and I promised him that along with this change, I would start making salads at most, if not every, meal. (I despise salads. I hate lettuce, but don't mind the veggies and fruit that can be added to salads- as long as they're not peppers. Bleh. They revisit in the most terrible of ways!!) And, I've succeeded! Tonight there was no salad, but there was yesterday and the day before that. (Just veggies tonight). :)
So, having said that, I am beginning a weight loss blog. Would you join me there?
Tonight, I've got a card to share rather than a layout. My MIL texted the other day to let me know that our niece, who is getting married the first of September, is having her wedding shower at our family reunion (which is coming up August long weekend). So, in roughly a week.
I don't have much wedding themed stuff in my stash, but I do have some, and I began thinking about what items I would want to use to create a card for her with. There was a tag that I played around with for quite some time, but it just didn't feel right to me. So, I dropped it, and tried another one. And, there it was! I find it funny how sometimes the smallest thing can make the biggest difference!
The die cut frame was cut with the Sweet Shop Cricut cartridge (as was the oval inside the frame mat). The wedding dress form is K&Co and the gold patterned paper is Martha Stewart. For a little bit of bling, I added white rhinestones around the waist, and clear and a black rhinestone to mimic a necklace. The joy stamp is from SU (mini phrases) and was stamped with Basic Black ink. All the rhinestones are Recollections.
I still need to make her an actual wedding card, but I'll save that for after our camping trip. There's other goodies that needs to be completed in the mean time!
Has anyone ever attempted making homemade croutons? (Hows that for a change of topic?!) The idea dawned on me earlier this week because I noticed the girls have begun eating around the bread crust. Rather than wasting it, I'm going to make croutons!! Since the reunion is coming up fairly quickly, I began thinking that it would be nice to bring out a nice caesar salad for everyone to munch on one day for lunch- that would be the perfect excuse to use up the homemade croutons I'm going to make. (I've just been saving them in a ziploc baggy and freezing them until a time that I would need them). The place we'll be camping is close enough to home that we'll be coming home every night, so this shouldn't be too hard to do. Hopefully!
And, speaking of food, I'm not sure if I mentioned this or not, but I've been thinking for a while that I wanted to try spinach in my smoothies- at least, mixing more veggies into the fruity mix. (Have I even mentioned that I'm on a huge fruit smoothie kick these days??) If not, I so am!! I did buy spinach, and I froze it (so that it wouldn't go bad, because otherwise it would, in this house!!) I can't even taste it. Neither can the girls, and as of today, neither can Kyle. Ding, Ding, Ding! Bonus points for mama! I'm pretty pumped. The girls don't even realize they're eating something super healthy. That makes it even better!
Why am I so insanely crazy about something that's so not something to get excited over?
After feeling disappointed in my appearance for quite some time- especially more so since the twins came along, I've decided to commit to do something about it. The first step actually began with the fruit smoothies. I figured if I could make it a regular thing in my household, it would help all four of us (but unfortunately its just the girls and I at the moment), get the nutrition we need. Because, lets face it, we don't always eat as healthy as we should. Then, I bought the girls vitamins. Which, is great, but I've learned that if Addison wants one, she'll ask for one. Otherwise, don't bother. She'll carry it around with her until she eventually drops it and forgets about it. Maren loves them, on the other hand. To her, its candy, and candy is goooood. Now I need to go out and find vitamins for Kyle and I.
The biggest change, though, is my own eating habits, and (previously) the lack of exercise. I'm starting to ache in strange places, for no apparent reason at all, and all I can think is at my age, I shouldn't be feeling this way. So, I'm changing it. This is still very, very new- as in only three days old, but I am more motivated now than I have been my entire life. I want to feel better about myself, and my appearance! I asked Kyle to hold me accountable to what I eat and when, and I promised him that along with this change, I would start making salads at most, if not every, meal. (I despise salads. I hate lettuce, but don't mind the veggies and fruit that can be added to salads- as long as they're not peppers. Bleh. They revisit in the most terrible of ways!!) And, I've succeeded! Tonight there was no salad, but there was yesterday and the day before that. (Just veggies tonight). :)
So, having said that, I am beginning a weight loss blog. Would you join me there?
Labels:
Addison,
dear husband,
family,
hobby,
I LOVE YOU,
kyle,
Maren,
Miss Addison,
Miss Maren,
scrapbook,
scrapbooking
Tuesday, July 24, 2012
Haven
I am suddenly in a phase where I want to re-organize and better utilize my scrapping space. My little haven is the smallest room in the house, and I'm certain that it isn't being used to its most organizational and utilitarian potential. I am on a mission! Of course, I'll be pinning the neato things I find to my Pinterest- what better way to keep track of things you want to remember than by Pinterest?! (...and then implementing, of course!!)
The first neato item I came across a couple days ago, reading this blog post. I already had a tackle box in my possession, but it was to store the (very) minimal brads that are in my stash. Even though it wasn't a large tackle box, by any means, it was way too large for the amount of brads and eyelets I have. So, I took them out, and put them in a little white container (for the time being), and began cutting up the oodles of sticker letters I've got, and separating them into their own compartments, just as that particular post shows. In fact, I have so much, that I had to go out and buy another one, just to make room for them all! And, as I was cutting, it dawned on me that it would be cool (and a great way to use up every possible inch of those sticker letters) to use up the negative portions of the letters already used. Duh!! How could I not have thought of that sooner?! Especially when I'm in a bind, and want to use a particular style of font? Sometimes its the simplest things that are overlooked.
This will help me to 1) maximize the amount of space that's being used up in the white storage containers I have the majority of my goodies stored in (at least as far as my sticker letters go), 2) free myself from the nightmare of opening that particular drawer and fighting the hoards of sticker letters that just want to jump out at me, and 3) organize!!!!
I'm not quite done yet, but I do have to say it feels so much better! Its inspired me to find other unique and creative ways to store and organize the rest of my embellishments. What are some of your favourite ways to store and organize your embellishments and paper stash--and scraps? I'd love to know!
(And, on a side note, in the rest of that post, she showed us the magic thin foam and the cuttlebug makes. I was so inspired by it, I went out and bought my own thin foam. I want to try it, too!)
You'll also know that washi tape is like huge these days, and everyone has it, and if you don't, you're on your way out the door to purchase it. I'm among those, too, but haven't actually bought any washi tape yet. I want to...one day! For now, I came across this neato technique. Brilliant, right??!
The only problem is, I don't own any spray inks. So, my first impulse was to write off even trying this technique because I didn't have all the essential items to make it work. Then I thought, why does it have to be spray ink? Why wouldn't regular ink and a sponge dauber work? Happily, it does!
Keep your eyes peeled for it appearing on future projects. It lookswicked so cool!! This little heart just skipped a beat, I'm so excited!
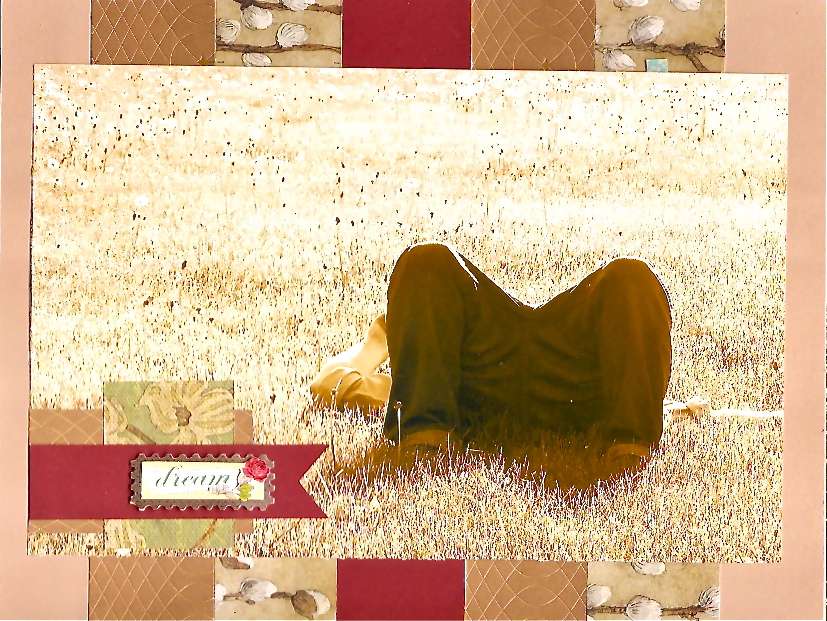
I've got another layout to share with you today:
And...this is the last layout from the day before Fathers Day series. When I finish getting things spruced up (for now), I'll be working on layouts of Fathers Day (which won't be very many) and then I can move on with my scrappy life.
This particular layout I absolutely adore. This picture of my BIL just moves me. Or something. I just love it. I love the point of view, I love the composition, I love that he's so chill. I love that its so candid. I love it in sepia!!
I scraplifted Kimberly.kalil's layout, "holy cows", which you can find here.
In particular, I loved the strips of patterned paper matted behind the photo (great opportunity to use up more scrap paper!!), and I loved her usage of a large picture. I'm pretty sure I have mentioned before that I love using extra big pictures. It should be common knowledge. Ha!
The patterned paper strips are Martha Stewart (the gold), the cotton tail paper is K&Co, and the red card stock is Autumn Leaves (Walmart). The little dream sticker is also K&Co.
There is some hidden journalling, but its just a little quote by Helen Keller: "Keep your face to the sunshine and you cannot see the shadows." Profound, and beautiful. Just like my picture!
The first neato item I came across a couple days ago, reading this blog post. I already had a tackle box in my possession, but it was to store the (very) minimal brads that are in my stash. Even though it wasn't a large tackle box, by any means, it was way too large for the amount of brads and eyelets I have. So, I took them out, and put them in a little white container (for the time being), and began cutting up the oodles of sticker letters I've got, and separating them into their own compartments, just as that particular post shows. In fact, I have so much, that I had to go out and buy another one, just to make room for them all! And, as I was cutting, it dawned on me that it would be cool (and a great way to use up every possible inch of those sticker letters) to use up the negative portions of the letters already used. Duh!! How could I not have thought of that sooner?! Especially when I'm in a bind, and want to use a particular style of font? Sometimes its the simplest things that are overlooked.
This will help me to 1) maximize the amount of space that's being used up in the white storage containers I have the majority of my goodies stored in (at least as far as my sticker letters go), 2) free myself from the nightmare of opening that particular drawer and fighting the hoards of sticker letters that just want to jump out at me, and 3) organize!!!!
I'm not quite done yet, but I do have to say it feels so much better! Its inspired me to find other unique and creative ways to store and organize the rest of my embellishments. What are some of your favourite ways to store and organize your embellishments and paper stash--and scraps? I'd love to know!
(And, on a side note, in the rest of that post, she showed us the magic thin foam and the cuttlebug makes. I was so inspired by it, I went out and bought my own thin foam. I want to try it, too!)
You'll also know that washi tape is like huge these days, and everyone has it, and if you don't, you're on your way out the door to purchase it. I'm among those, too, but haven't actually bought any washi tape yet. I want to...one day! For now, I came across this neato technique. Brilliant, right??!
The only problem is, I don't own any spray inks. So, my first impulse was to write off even trying this technique because I didn't have all the essential items to make it work. Then I thought, why does it have to be spray ink? Why wouldn't regular ink and a sponge dauber work? Happily, it does!
Keep your eyes peeled for it appearing on future projects. It looks
I've got another layout to share with you today:
And...this is the last layout from the day before Fathers Day series. When I finish getting things spruced up (for now), I'll be working on layouts of Fathers Day (which won't be very many) and then I can move on with my scrappy life.
This particular layout I absolutely adore. This picture of my BIL just moves me. Or something. I just love it. I love the point of view, I love the composition, I love that he's so chill. I love that its so candid. I love it in sepia!!
I scraplifted Kimberly.kalil's layout, "holy cows", which you can find here.
In particular, I loved the strips of patterned paper matted behind the photo (great opportunity to use up more scrap paper!!), and I loved her usage of a large picture. I'm pretty sure I have mentioned before that I love using extra big pictures. It should be common knowledge. Ha!
The patterned paper strips are Martha Stewart (the gold), the cotton tail paper is K&Co, and the red card stock is Autumn Leaves (Walmart). The little dream sticker is also K&Co.
There is some hidden journalling, but its just a little quote by Helen Keller: "Keep your face to the sunshine and you cannot see the shadows." Profound, and beautiful. Just like my picture!
Monday, July 23, 2012
Near the End
Phew- what an incredible day, weather wise today! There was severe weather all over the place. Did you have any severe weather?
For something a little different today, this layout is a scrap lift of Heathers' We Never Get Any Sleep! layout. I absolutely adored the shapes of her photos- love the retro, flower/leafy look the rounded edges on the opposite corners looks. Instead of going with bold, dark prints like Heather did, I wanted to mimic the look of the grass in the bottom picture- bright green, contrasted with the white fluff of dandelions. Doesn't it just scream summer?!
Once again, I turned to the Sweet Nectar paper pad that's been lurking in the depths of my stash, and recently popping up on a lot of my projects. Some scraps were used, like the punched strip of floral paper, and the yellow card stock its matted on. (On that piece of yellow card stock, I used my 'baby's breath' cuttlebug embossing folder for some interest and dimension).
I can't remember where I got the blue buttons from, but the 'free' sticker at the top is K&Co, and the little 'sweet' sticker at the bottom (nestled next to the flowers) is also K&Co. I made the flowers myself: they're easy peasy!!
All you do is take your circle punch (or punches), punch as many circles as you like; crumple them, then layer them. Voila, instant flowers! The punch sizes I used were .5" and 1.5" by Creative Memories. The pearl rhinestones are Recollections. And, to create a 'mat' that the photo's are adhered to, I just took a black pen and drew a border around the outside edge, mirroring the same shape the patterned paper/photo mats are.
Once again, the girls were playing at the park. These pictures were taken near the end of our excursion there. I wasn't near enough to them to know fully what was going on, but I imagine they were playing' super bunny...to the rescue!' Addison's arms spread out beside her suggests that (I'll give you a little hint: her arms are mimicking a cape!!) Hee isn't that the darlingest thing ever??!
Yes, a mother in love. For sure.
Tomorrow, I'll have one last layout from our play date at the park over Fathers' Day. After that, there'll be some pictures from Father's Day.
Stay tuned!!
~a
For something a little different today, this layout is a scrap lift of Heathers' We Never Get Any Sleep! layout. I absolutely adored the shapes of her photos- love the retro, flower/leafy look the rounded edges on the opposite corners looks. Instead of going with bold, dark prints like Heather did, I wanted to mimic the look of the grass in the bottom picture- bright green, contrasted with the white fluff of dandelions. Doesn't it just scream summer?!
Once again, I turned to the Sweet Nectar paper pad that's been lurking in the depths of my stash, and recently popping up on a lot of my projects. Some scraps were used, like the punched strip of floral paper, and the yellow card stock its matted on. (On that piece of yellow card stock, I used my 'baby's breath' cuttlebug embossing folder for some interest and dimension).
I can't remember where I got the blue buttons from, but the 'free' sticker at the top is K&Co, and the little 'sweet' sticker at the bottom (nestled next to the flowers) is also K&Co. I made the flowers myself: they're easy peasy!!
All you do is take your circle punch (or punches), punch as many circles as you like; crumple them, then layer them. Voila, instant flowers! The punch sizes I used were .5" and 1.5" by Creative Memories. The pearl rhinestones are Recollections. And, to create a 'mat' that the photo's are adhered to, I just took a black pen and drew a border around the outside edge, mirroring the same shape the patterned paper/photo mats are.
Once again, the girls were playing at the park. These pictures were taken near the end of our excursion there. I wasn't near enough to them to know fully what was going on, but I imagine they were playing' super bunny...to the rescue!' Addison's arms spread out beside her suggests that (I'll give you a little hint: her arms are mimicking a cape!!) Hee isn't that the darlingest thing ever??!
Yes, a mother in love. For sure.
Tomorrow, I'll have one last layout from our play date at the park over Fathers' Day. After that, there'll be some pictures from Father's Day.
Stay tuned!!
~a
Labels:
Addison,
all together,
auntie,
dear,
dear husband,
family,
hobby,
I LOVE YOU,
Maren,
Miss Addison,
Miss Maren,
scrapbook,
scrapbooking,
Thankful,
uncle
Sunday, July 22, 2012
Prepare to be Amazed!
On a whim, I brought out one of my scrapbook albums this afternoon, and showed it to the girls. I never imagined that at this age (2.5) they would be so into looking at the pictures in my albums. In total, we browsed through 4 entire scrapbook albums! And, I've concluded that I need to do it a little more often- so they learn the faces of the people in them, and a little bit about who they are. In that respect, its better to start now than when they are older. For example, there's a few layouts with my Oma- the girls' great Oma- and they wouldn't know who she is from Adam. They have met her- when they were tiny little infants, but they don't remember her. And, they'll never know her intimately like I did growing up. But, they can learn about her and love her through the pages that are dedicated to her.
On another note, I'm deeply touched that what I've been dedicated {obsessively} to working on for my family and those still to come, is so special to the girls. Already. I was almost moved to tears this evening when I was talking with Kyle about it! Of course they would appreciate it, but in my mind, that appreciation would be many years down the road. I never thought that it would be this soon. Wow. Just. Wow!! At least I know (thankfully) none of what's in those albums is in vain. KWIM???!
I have another layout to share tonight:
This was such a fun layout to make! Its based on the Monthly Sketch Challenges' Bonus Sketch for week 3, which you can find right here. I flipped the sketch upside down and turned it backwards so that it would work better with the photo I chose to scrapbook.
And, the picture I chose is still from the Father's Day weekend bash. Here, Auntie is walking with Dear Maren in her arms. I just adore this picture of the two of them! And, I love that she's taking such a keen interest in spending time with them. But, how could she not? She's my person, after all! She helped bring them into the world- by extension, they're almost like her own children!
I began thinking that when we look back on this picture, we're going to wonder exactly how old Maren was when this picture was taken. So, in the journalling spot, I jotted down the magical number (which is 29 months old. But, I realized that's a typo after I got it scanned. She's actually 28 months old in this picture. My bad!! I still have to fix that).
All the papers I used are K& Co, but not from the same lines. (The one that the title is matted on is from the 'best of' paper pad, and the rest are from the Brenda Walton Designer paper pack). The black card stock is Recollections, I think.
Have a great night, everyone! I'm off to work on another layout before heading off to bed.
~a
On another note, I'm deeply touched that what I've been dedicated {obsessively} to working on for my family and those still to come, is so special to the girls. Already. I was almost moved to tears this evening when I was talking with Kyle about it! Of course they would appreciate it, but in my mind, that appreciation would be many years down the road. I never thought that it would be this soon. Wow. Just. Wow!! At least I know (thankfully) none of what's in those albums is in vain. KWIM???!
I have another layout to share tonight:
This was such a fun layout to make! Its based on the Monthly Sketch Challenges' Bonus Sketch for week 3, which you can find right here. I flipped the sketch upside down and turned it backwards so that it would work better with the photo I chose to scrapbook.
And, the picture I chose is still from the Father's Day weekend bash. Here, Auntie is walking with Dear Maren in her arms. I just adore this picture of the two of them! And, I love that she's taking such a keen interest in spending time with them. But, how could she not? She's my person, after all! She helped bring them into the world- by extension, they're almost like her own children!
I began thinking that when we look back on this picture, we're going to wonder exactly how old Maren was when this picture was taken. So, in the journalling spot, I jotted down the magical number (which is 29 months old. But, I realized that's a typo after I got it scanned. She's actually 28 months old in this picture. My bad!! I still have to fix that).
All the papers I used are K& Co, but not from the same lines. (The one that the title is matted on is from the 'best of' paper pad, and the rest are from the Brenda Walton Designer paper pack). The black card stock is Recollections, I think.
Have a great night, everyone! I'm off to work on another layout before heading off to bed.
~a
Labels:
all together,
auntie,
beautiful,
dear husband,
family,
hobby,
I LOVE YOU,
Maren,
Miss Maren,
Oma,
scrapbook,
scrapbooking,
twinlets
Saturday, July 21, 2012
DIY Chevron
I've been sitting on this lo for a while, and I've just been itching to share it with you!
I came across a really neat tutorial over at Creating Keepsakes' Blog on making your very own chevron design from your stash! What a great idea--and Ilove adore how it looks! In addition to making each letter in my titles blocked (another favourite technique), you'll be finding a lot of this in my projects, as well!
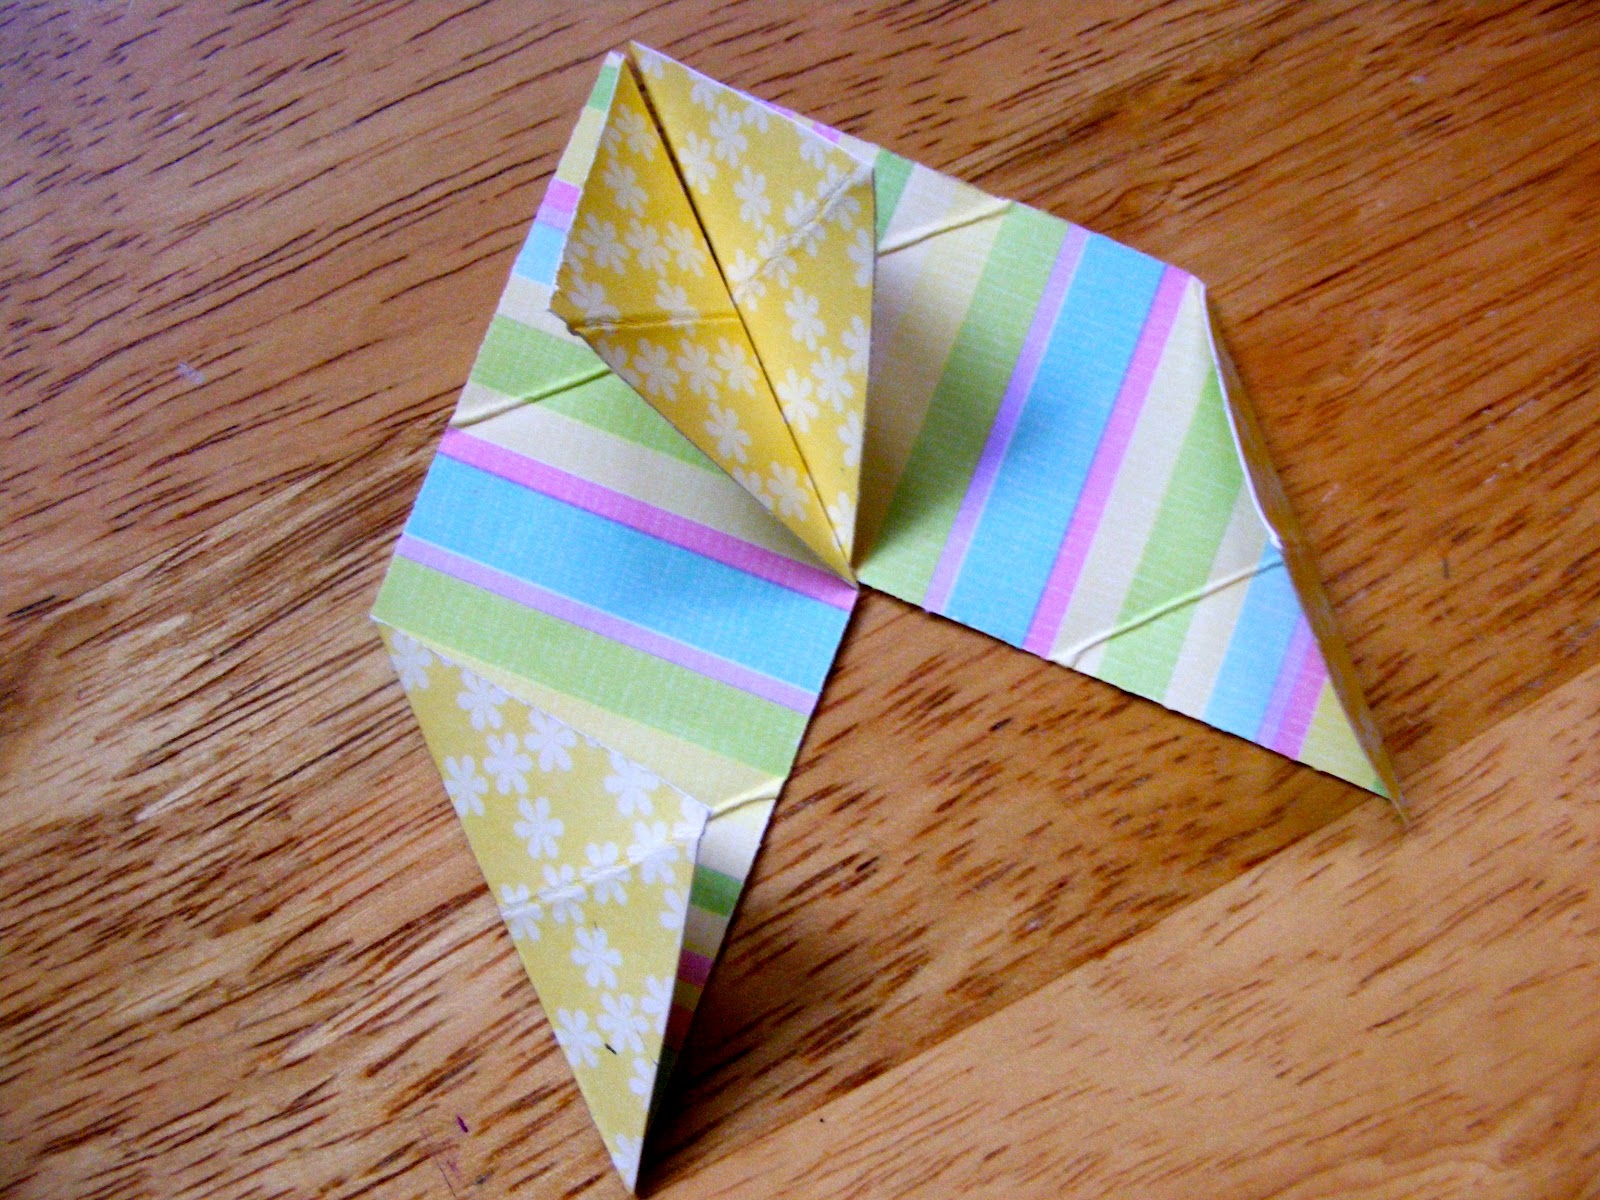
One thing I learned while trying to figure out how to do this: the size of paper doesn't matter. In this particular project, each piece of patterned paper to make up the sides of the chevron are 1'(w) by 3'(l). The longer and wider they are, the higher and deeper your chevrons become! Also, remember to alternate which sides you fold down with each strip of patterned paper you use. It took me quite a while to figure out why it wasn't working...it wasn't until the first half were adhered to the card stock background that the little proverbial lightbulb came on.
So, to explain a little more precisely: with your first piece of patterned paper, fold down the top left corner, so it makes a triangle shape, then fold the bottom right edge up; on your next strip of patterned paper, fold the bottom left portion up, and the top right portion down, always making little triangles. When you fit the folded edges together, it should make the chevron pattern. (If I am not making sense, head on over to Creating Keepsakes--it'll make sense there).
(You can see a ton of fold lines in this strip of patterned paper because I was using it to practice)
Top left corner folded down
Bottom right corner folded up
This is the second strip of patterned paper; fold the bottom left portion up
Fold the top right portion down
When both strips of patterned paper are aligned, you've got the chevron pattern! Voila!
And, here's the masterpiece I made using this technique:
This was made using sketch #141 over at Let's Capture These Sketches. Definitely head over there and see what the girls have done with this beautiful sketch!
If you make any projects using this technique, send me the link so I can see too! I'd love to see how you use it. And, don't forget to drop by Creating Keepsakes and link your project to their blog, too!
I came across a really neat tutorial over at Creating Keepsakes' Blog on making your very own chevron design from your stash! What a great idea--and I
One thing I learned while trying to figure out how to do this: the size of paper doesn't matter. In this particular project, each piece of patterned paper to make up the sides of the chevron are 1'(w) by 3'(l). The longer and wider they are, the higher and deeper your chevrons become! Also, remember to alternate which sides you fold down with each strip of patterned paper you use. It took me quite a while to figure out why it wasn't working...it wasn't until the first half were adhered to the card stock background that the little proverbial lightbulb came on.
So, to explain a little more precisely: with your first piece of patterned paper, fold down the top left corner, so it makes a triangle shape, then fold the bottom right edge up; on your next strip of patterned paper, fold the bottom left portion up, and the top right portion down, always making little triangles. When you fit the folded edges together, it should make the chevron pattern. (If I am not making sense, head on over to Creating Keepsakes--it'll make sense there).
(You can see a ton of fold lines in this strip of patterned paper because I was using it to practice)
Top left corner folded down
Bottom right corner folded up
This is the second strip of patterned paper; fold the bottom left portion up
Fold the top right portion down
When both strips of patterned paper are aligned, you've got the chevron pattern! Voila!
And, here's the masterpiece I made using this technique:
This was made using sketch #141 over at Let's Capture These Sketches. Definitely head over there and see what the girls have done with this beautiful sketch!
If you make any projects using this technique, send me the link so I can see too! I'd love to see how you use it. And, don't forget to drop by Creating Keepsakes and link your project to their blog, too!
Labels:
all together,
auntie,
family,
hobby,
Maren,
Miss Maren,
scrapbook,
scrapbooking
Friday, July 20, 2012
Once, Many Moons Ago...
Thought I'd share a fun layout with you today!
While auntie and uncle were down here last celebrating Fathers' Day with us (you may remember that I've been referencing that a lot lately!!) we played at the park with the kids until their bedtime. Auntie and daddy got the bright idea to try and go down the twisty slide like the kids (auntie, mainly as a way to encourage the girls to go down it with her. They still think its a pretty scary thing!!!) Daddy- just because he was showing off. LOL
He did mention that we may need to call 911 if he got stuck. Thankfully--he didn't! It was a tight squeeze, though.
Hilarious, right?
The sketch I used for this layout was done by Melissa over at What's Scrappenin'? You can also find her over at scrapbook.com. I did this for the Monthly Sketch challenge (which is where the sketch came from), week 3.
I did a lot of stamping on this one, and everything that's stamped or inked was done using SU's chocolate chip. The stamps I used on the grey card stock are Autumn Leaves (Walmart), the journalling spot is also Autumn Leaves; the ties and the 'best dad ever' stamps are all from SU's Best Dad Ever set.
The blue gingham pp is SU (from many, many moons ago), and the alpha stickers in my title work are probably also from Walmart. (They're half used up- from my MIL...I am not sure where they came from!) I fussy cut the banner on which my title work is adhered.
There you have it! Simple, but loads of fun! (And a laugh or two)
ANother weekend is here. We are laying low this weekend. What are your plans?
While auntie and uncle were down here last celebrating Fathers' Day with us (you may remember that I've been referencing that a lot lately!!) we played at the park with the kids until their bedtime. Auntie and daddy got the bright idea to try and go down the twisty slide like the kids (auntie, mainly as a way to encourage the girls to go down it with her. They still think its a pretty scary thing!!!) Daddy- just because he was showing off. LOL
He did mention that we may need to call 911 if he got stuck. Thankfully--he didn't! It was a tight squeeze, though.
Hilarious, right?
The sketch I used for this layout was done by Melissa over at What's Scrappenin'? You can also find her over at scrapbook.com. I did this for the Monthly Sketch challenge (which is where the sketch came from), week 3.
I did a lot of stamping on this one, and everything that's stamped or inked was done using SU's chocolate chip. The stamps I used on the grey card stock are Autumn Leaves (Walmart), the journalling spot is also Autumn Leaves; the ties and the 'best dad ever' stamps are all from SU's Best Dad Ever set.
The blue gingham pp is SU (from many, many moons ago), and the alpha stickers in my title work are probably also from Walmart. (They're half used up- from my MIL...I am not sure where they came from!) I fussy cut the banner on which my title work is adhered.
There you have it! Simple, but loads of fun! (And a laugh or two)
ANother weekend is here. We are laying low this weekend. What are your plans?
Labels:
auntie,
dear husband,
family,
home,
humble abode,
I LOVE YOU,
twinlets
Subscribe to:
Posts (Atom)